Nikon NEXIV VMZ-S3020
Overview
Nikon’s excellent optics give high accuracy and repeatability across the field of view, increasing speed of measurement. VMZ-S3020 offers a 300 x 200 x 200 (X x Y x Z)mm stroke suitable for measurement of small semiconductor, electronic and mechanical components.
Key Benefits:
– High accuracy within the field of view (FOV)
– Improvement of throughput
– New Design
– Measurement programming support
– 8-segment ring illumination with three incident angles
– High measuring accuracy
Benefits & features
High accuracy within the field of view (FOV)
Accuracy within FOV (PF2D,PFV2D) is specified. Nikon designed optics deliver high-quality images and realize accurate measurement data. (Proving error* PF2D0.8µm).
– Type2 zooming head. Determined by Nikon’s in-house measurement method. Measurement of the perimeter of a circular reference device. This involves stage movement so a video caliper tool within the FOV, is evenly placed at 25 points on the perimeter.
– Probing error of the imaging probe* PFV2D 0.3 µm
– *Type2 zooming head. Determined by Nikon’s in-house measurement method. Measurement of 25 points that are evenly placed on the perimeter of a circular reference device at one location on the screen (without stage movement).
Improvement of throughput
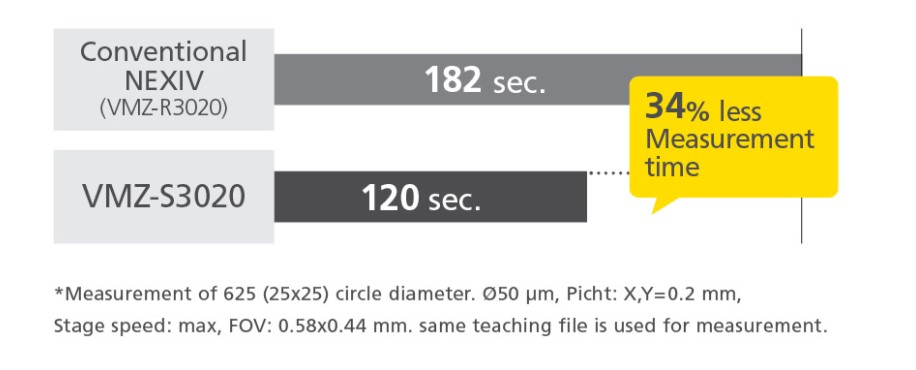
Throughput has improved by realizing faster short-distance stage movements. This contributes to the shortening of the measurement time.
New Design
Along with the exterior design change, the joystick used for stage and optical head movements has been redesigned to make machine operation easier and less tiring during long periods of use.
Measurement programming support
Dimension software NEXIV AutoMeasure realizes high precision / high speed / easy measurement with many valuable functions. An important new function supports the measurement program creation processes. By selecting the measurement point, several settings are handled by the system and measurement program code is created automatically.*
*This function is for workpieces with simple shape structure.
Guide of conditions: With diascopic illumination. Components with perforations or voids with clearly detected edge contours, without significant variations, or material contamination. (circle, rectangle, and circular arc)
8-segment ring illumination with three incident angles
Standard magnification zooming heads (type 1-3) come with 8-segment LED inner and outer ring illuminators as well as episcopic and diascopic illuminators. Incident angles of 37, 55 and 75 degrees, illumination directions by combining any 8-segment lights and light intensity can be adjusted.

Specifications
Stroke (X Y Z): 300×200×200 mm *Type TZ with low magnification lens: 250×200×200 mm
Minimum readout: 0.01 µm
Maximum workpiece weight: 20 kg (44.1 lb.)
Measuring uncertainty: EUX,MPE EUY,MPE: 1.2+4L/1000 μm EUXY, MPE: 2+4L/1000 μm
Z measurement uncertainty: EUZ,MPE: 1.2+5L/1000 μm (with Laser AF)
Camera: Black and White / Color 1/3 CMOS Camera
XYZ strokes: 300×200×200 mm *Type TZ with low magnification lens: 250×200×200 mm
Laser AF repeatability range 1),3): 2σ ≦ 0.5 µm
Auto focus: Type 1, 2, 3, 4 and TZ come with TTL laser AF and vision AF. Type A comes with vision AF as standard and with laser AF as an option.
Illumination: Type 1, 2, 3, and 4 : Episcopic, diascopic, and 8-segment ring with 3 angles *All white LED/Type 4 has only 1 angle Type TZ: Left objective lens: Episcopic, darkfield ; Right objective lens: Episcopic, diascopic, darkfield Type A: Episcopic, diascopic, and 8-segment ring with 1 angle *All white LED
Power source: AC 100-240V 50/60Hz
Power consumption: 5A-2.5A
Dimensions & weight (W x D x H): Main body with table (W×D×H): 700×730×1793 mm / approx. 265 kg Controller: 190×450×450 mm / approx. 12 kg
Footprint: 2700 x 2400 mm


